


This guide is part of the word 2013 series
1. How to add AutoFormat to the toolbar in word 2013
2. How to automatically format a doc in Word 2013
3. How to avoid replacing selected text when typing
4. How to create a Drop cap in Word 2013
5. How to disable Hyperlinks in word 2013
6. How to pin a folder to the open screen in word
7. How to pin files to the Open screen in word 2013
8. How to remove the Paste box in word 2013
9. Turn off Automatic Numbered list in Word 2013
Make: Microsoft
Model / Product: Word
Version: 2013
Objective / Info: To show how to add the AutoFormat tool to the toolbar in Word 2013.
Model / Product: Word
Version: 2013
Objective / Info: To show how to add the AutoFormat tool to the toolbar in Word 2013.
1
From Word, click the down arrow on the "Quick Access Toolbar", then select "More Commands".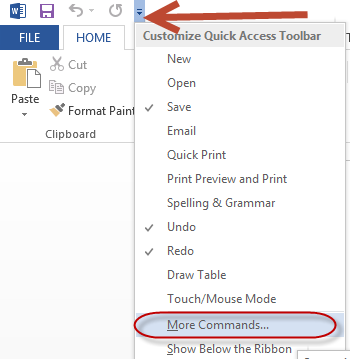
2
Select "Commands Not In The Ribbon" from the "Choose Commands From" drop-down list.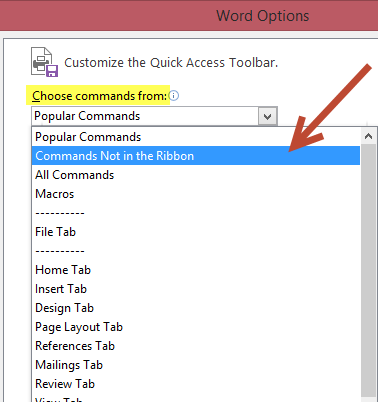
3
Scroll down the list of options under the "Choose Commands From" list, select "AutoFormat", and click add. Note :
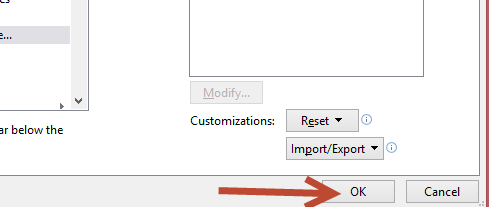
AutoFormat now appears in the box to the right under "Quick Access Toolbar."

4
Click OK, to close the "Word Options" toolbar.
5
This task should now be complete. If not, review and repeat the steps as needed. Submit any questions using the section at the bottom of this page.comments powered by Disqus
 Ask a question or provide an answer