


This guide is part of the Screen capture series
1.
How to take a pageshot on a MacBook Air
2. How to take a screenshot
3. How to take a screenshot in Windows 7
4. How to take a screenshot in windows xp
5. How to take a screenshot in Word 2010
6. How to take a screenshot on a MacBook Air
7. How to take a screenshot on an iPad
2. How to take a screenshot
3. How to take a screenshot in Windows 7
4. How to take a screenshot in windows xp
5. How to take a screenshot in Word 2010
6. How to take a screenshot on a MacBook Air
7. How to take a screenshot on an iPad
Make: Apple
Model / Product: MacBook Air
Version: OS X 10.6.5
Objective / Info: Learn how to take a screenshot on a MacBook Air.
Model / Product: MacBook Air
Version: OS X 10.6.5
Objective / Info: Learn how to take a screenshot on a MacBook Air.
1
Use your Macbook Air and browse to the desktop or website that you want to take the screenshot of.2
Click the "4" + "Shift"+ "Command" keys on the keyboard at the same time.3
Click and drag the crosshairs until the area you want to capture is selected.4
Release the touch-pad to capture the screenshot. You should hear a camera clicking sound indicating that the screenshot has been captured.5
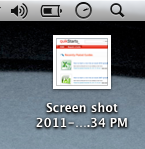
The captured image should appear on the desktop labeled in this manner "Screen shot 2011-12-30 at 2.17.03 PM.png" Note :
The name for your screenshot will reflect the time and date when you took it.
6
This task should be complete. Review the steps if you had any issues and try again.Submit questions or request for more guides in the questions section below.comments powered by Disqus
 Ask a question or provide an answer